Sunday, February 28, 2021

Komunikasi NB IoT NBIOT NB-IoT TELKOMSEL dengan modem Quectel BG96 Quectel BG-96 GPS GSM GPRS 4 BAND MODULE


Reset dan Power ON

Pada saat pertama kali modul disambungkan dengan baterai, sistem BG96 harus diberikan input pulsa reset minimal 500mS. Kemudian dilanjutkan dengan input pulsa Powerkey minimal 200mS.

Modem READY

Setelah power up berhasil maka tunggu sampai modem BG96 apakah sudah siap atau belum. Apabila ada balasan dari port serial berupa data karakter ASCII : "RDY", maka modem siap menerima perintah berikutnya.

    RDY

Respons AT OK

Kemudian lanjut kirim command melalui port serial data karakter ASCII "AT" dan tunggu sampai dibalas "OK"

    AT

    OK


Cek Fungsional Modem

AT+CFUN?

+CFUN: 1

OK


Cek SIM Card Status

AT+CPIN?

+CPIN: READY

OK


Cek Jaringan Operator Seluler

AT+COPS?

+COPS: 0,0,"Tsel-PakaiMasker",0

OK
 

Cek EPS Network Registration Status

AT+CEREG/

+CEREG: 0,4

OK


REBOOT Modules Apabila setelah 90 detik nilai CEREG tidak bernilai 1 atau 5

AT+CFUN=1,1

OK

POWERED DOWN

RDY


Disable Result Code - Error Message Format

AT+CMEE=0

OK 


Disable Time Zone Reporting of changed Event  - Time Zone Reporting
AT+CTZR=0

OK

Enable Automatic Time Zone Update

AT+CTZU=1

OK

Configure  Network  Category  to  be  Searched  under LTE (cat M1, cat NB1, cat M1 & NB1)
AT+QCFG="iotopmode",0,1

OK

Configure RAT(s) to be Searched (Auto , GSM, LTE)
AT+QCFG="nwscanmode",0,1

OK

Configure APN for PDP Context Profile

AT+QICSGP=1,1,"NB1INTERNET","","",0  // APN Telkomsel = NB1INTERNET

OK

Aktivasi PDP Context Profile

AT+QIACT=1                           // Activate context profile 1
 
OK                                             // Activation is successful
    
AT+QIACT?                             // Query context profile status
 
+QIACT: 1,1,1,"10.7.157.1"
 
OK


Open a TCP connection to the remote server, TCP Client works in buffer access mode

AT+QIOPEN=1,0,"TCP","202.74.236.117",1883,0,0    // Establish a TCP connection in context 
                                                                                         // profile 1, <connectid> is 0
 OK
 
 +QIOPEN: 0,0                                                                // Connected successfully


Send Data in Buffer Access Mode

AT+QISEND=0       // Send  changeable  length  data.  “SEND  OK”  does  not  mean  the                 
                                 // data has been sent to the server successfully. The host can query
                                 // whether the data has reached the server via AT+QISEND=0,0.
 
>test1<ctrl+Z>
 
SEND OK

AT+QISEND=0,4           //Send fixed length data and the data length is 4bytes.
 
>test
 
SEND OK
 
AT+QISEND=0,0            //Query the length of sent data.
 
+QISEND: 9,9,0

OK


Check the connection state

AT+QISTATE=1,0 //Query the connection status when <connectid> is 0
 

+QISTATE: 0,"TCP","202.74.236.117",1883,16309,2,1,0,0,"uart1"

OK


Receive Data from Remote Server in Buffer Access Mode

+QIURC: “recv”,0    // The <connectID> 0 received data.
AT+QIRD=0,1500    // Read data, and the length is 1500bytes.
+QIRD: 5                  // The length of actual received data is 5bytes.
 

test1

OK

AT+QIRD=0,1500
+QIRD: 0                  // No data in buffer.
OK

AT+QIRD=0,0         // Query the total length of received data,
                                 // including read and unreaddata.
+QIRD: 5,5,0

OK


Read the server respons

AT+QIRD=0,0

+QIRD: 0,0,0

OK


Cek Signal Modem

AT+QCSQ

+QCSQ: "GSM",-74

OK


Board BG96 dapat diorder disini: 

https://tokopedia.com/fawwazzshop/nb-iot-stm32-quectel-bg96-gps-gsm-gprs-4-band-module-modul-for-arduino

Pemrograman STM32 di Arduino IDE menggunakan JTAG downloader STLINK V2 (STM32CubeProgramming - SWD )

Arduino menjadi board pertama bagi banyak pengguna mikrokontroller dan pelajar, mahasiswa dan engineer ketika mereka mulai dengan elektronik. Namun, ketika kita mulai membangun lebih banyak dan menggali lebih dalam, kita akan segera menyadari bahwa Arduino belum banyak digunakan untuk industri dan karena merupakan CPU 8-bit maka kinerjanya dinilai kurang cepat. Sedangkan STM32F103C8T6 STM32 Development Board (Blue Pill) baru banyak di pasaran dengan harga yang terjangkau, sehingga banyak sekarang yang menggunakan nya untuk berbagai project yang mana STM32 merupakan CPU 32-bit dan arsitektur ARM Cortex M3. gi bahwa kita dapat menggunakan Arduino IDE yang sama untuk memprogram board STM32 kita. 

Spesifikasi STM32F103C8T6

STM » adalah nama produsen STMicroelectronics
32 » adalah arsitektur ARM 32-bit
F103 » berdiri untuk menunjukkan bahwa arsitektur ARM Cortex M3
C » 48-pin
8 » Memori Flash 64KB
T » jenis paket adalah LQFP
6 » suhu pengoperasian -40 ° C hingga + 85 ° C

Berikut adalah spesifikasi Microcontroller ini :

  • Arsitektur : 32-bit ARM Cortex M3
  • Tegangan Pengoperasian : 2.7V hingga 3.6V
  • Frekuensi CPU : 72 MHz
  • Jumlah pin GPIO : 37
  • Jumlah pin PWM : 12
  • Pin input analog : 10 (12-bit)
  • Periferal USART : 3
  • Perangkat I2C : 2
  • Periferal SPI : 2
  • CAN 2.0 Periferal : 1
  • Timer : 3 (16-bit), 1 (PWM)
  • Memori Flash : 64KB
  • RAM: 20kB

Bagaimana cara memprogram Board STM32

STM32 merupakan mikrokontroler dari keluarga STMicroelectronics. Jadi semua metode yang ada untuk memprogram chip ARM dapat digunakan untuk papan STM32 juga. Salah satu IDE terkenal dan umum digunakan adalah Keil ARM MDK dan selain itu kita juga dapat menggunakan IAR, Atollic TrueStudio, MicroC Pro ARM, ARM Crossworks, Ride 7, PlatformIO + STM32 dll.

Namun yang membuat board ini sangat populer adalah kemampuannya untuk diprogram dengan Arduino IDE. Dengan cara ini orang dapat memulai dan membangun proyek dengan STM32 dalam waktu singkat karena banyak yang sudah terbiasa dengan Arduino IDE dan bahasa pemrograman yang mudah digunakan dan banyak dukungan library yang tersedia. Untuk itu dalam tutorial ini kita akan menggunakan IDE Arduino untuk memulai dengan STM32.

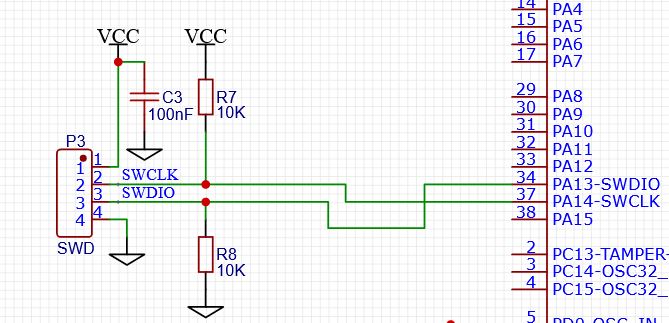
Pin JTAG STM32 - SWDIO dan SWCLK

Kelebihan dari download program menggunakan pin JTAG di STM32 adalah user tidak perlu merubah setting boot mode pada pin boot0 dan boot1 di STM32 seperti pada saat download program menggunakan port serial di STM32. Jadi user tidak perlu menyediakan dan merubah jumper switch boot0 dan boot1 pada saat download program ataupun pada saat running program. Kedua pin boot0 dan boot1 disetting terhubung ke ground.

Untuk memprogram papan STM32 langsung dari Arduino IDE kita menggunakan pin programming JTAG yang tersedia oleh STM32 yaitu pin SWDIO (PA13) dan pin SWCLK (PA14). Modul JTAG programmer / downloader  STLINK V2 dihubungkan dengan pin SWDIO (PA13) dan pin SWCLK (PA14) dari STM32 seperti yang ditunjukkan di bawah ini.


Pin VCC dari STLINK V2 dipilih menyesuaikan dengan power VCC dari STM32 yaitu 3.2V. Ground terhubung ke ground STM32. Pin SWDIO dan SWCLK pada modul STLINK V2 masing-masing terhubung ke pin PA13 dan PA14 dari STM32.

Mempersiapkan Arduino IDE untuk STM32

Ikuti langkah-langkah di bawah ini untuk mengunduh dan menyiapkan Arduino IDE untuk digunakan dengan board STM32.

Langkah 1: – Jika Anda belum menginstal Arduino IDE, unduh dan instal dari tautan ini. Pastikan Anda memilih sistem operasi yang benar.

Langkah 2: – Setelah Menginstal Arduino IDE buka dan unduh paket yang diperlukan untuk papan STM32. Ini dapat dilakukan dengan memilih File -> Preferences.

Langkah 3: – Mengklik Preferensi akan membuka kotak dialog yang ditunjukkan di bawah ini. Di kotak teks URL Boards Manager tambahan tempel tautan di bawah ini :

dan tekan OK.


Langkah 4: – Sekarang pergi ke Tools -> Board -> Board Manajer. Ini akan membuka kotak dialog Boards manager, mencari “STM32 Cores” dan menginstal paket yang muncul.

Langkah 5: – Setelah paket instalasi selesai. Pergi ke Tools dan geser ke bawah untuk menemukan seri Generic STM32F103C seperti yang ditunjukkan di bawah ini. Kemudian pastikan variannya adalah tipe 64kFlash, kecepatan CPU adalah 72MHz dan ubah metode upload ke "STM32CubeProgrammer (SWD)" .


Langkah 6: – Untuk upload / download program menggunakan JTAG STLINK V2, user harus mendownload STM32CubeProgrammer di tautan link di bawah ini:

Langkah 7: – Setelah semua perubahan dilakukan, dan STM32CubeProgrammer telah diinstall. Pada Arduino IDE klik tombol upload untuk menguji program Blink test ke board STM32. apabila proses upload berhasil akan muncul status seperti gambar di bawah ini:


Saturday, December 19, 2020

Modifikasi meteran air PDAM analog menjadi digital dengan penambahan hall effect sensor


 Output dari hall effect sensor ini adalah pulsa. 

Pada jarum pointer x0.001 meteran air analog telah ditempelkan magnet permanen bulat kecil agar bisa terbaca oleh sensor hall effect apabila melewatinya. Gambar dibawah ini adalah penempatan magnet pada jarum pointer x0.001 meteran air.


Setiap jarum pointer x0.001 melewati sensor 1kali putaran, ini menunjukkan bahwa debit air yang melewati meteran adalah senilai 1 x 0.001 meter kubik.

Sensor hall effect dipasangkan 2 buah dengan posisi melingkar sisi kiri dan kanan diatas jarum pointer x0.001 meteran air analog, silahkan cek gambar dibawa ini untuk detail pemasangan sensornya. 


Dengan adanya dua sensor ini akan terbaca kondisi saat jarum pointer (magnet) masuk melewati sensor 1 dan kemudian keluar melewati sensor 2. Ini menunjukkan bahwa arah putaran jarum pointer adalah searah jarum jam. Apabila arah putaran jarum pointer berlawanan arah jarum jam, maka sensor akan terbaca pertama masuk melewati sensor 2 kemudian keluar melewati sensor 1.

 
Pada meteran air ini dilengkapi dengan kran digital (motorized ball valve) yang terdapat 2 sensor limit switch buka penuh dan sensor limit switch tutup penuh. 


Kran digital ini digunakan oleh operator penyedia Air bersih utuk menutup sumber air apabila pelanggan belum melakukan pembayaran tagihan atau pulsa air habis.


Modul ini bisa dibeli pada link tokopedia dibawah ini:

https://www.tokopedia.com/fawwazzshop/meteran-air-pdam-digital-dgn-hall-sensor-motorized-ball-valve-2-way

Sunday, November 18, 2018

Unboxing GSM 3000 GSM3000 Gyro Stabilization Mount


Check the GSM3000 mount firmware version by connecting the mount Interface to PC via USBtoSerial Converter. Use serial terminal software to check data sent/received from GSM3000. Power off the Gimbal and restart it again, at the first initialization the GSM3000 will send firmware version to serial lines. Please check picture below.


Note: GSM3000 mount firmware version “GSM3000_V4.8.836” is required to control the GSM3000 mount with the POS. The bolded ‘8’ tells indicates that this firmware is intended to be used with the Applanix POS AV. Contact SOMAG for the firmware upgrade.

From the serial monitor software, it shown that the firmware version of the GSM3000 is as required to mount with POS AV.

YDC must be enabled via the POSConfig software utility by selecting the YDC Output option. This option requires an authorization code to enable software functionality. The authorization code must be purchased from Applanix. If the YDC has been enabled, the Statistic Window will show a YDC-O option in the Option string.


POSConfig Utility
POSConfig is used to change the PCS settings such as POS AV model, IMU or GNSS types, or enable specific options. Contact Applanix Technical Support and Service before using.
The following options are currently available:
• 04 Yaw Drift Correction (YDC)
Enables the automatic steering of a stabilized mount, using the real-time navigation solution. Refer to the Specification for Yaw Drift Control description on page J-1 for details.
• 11 Event Based Navigation Output (EVO)
Enables the output of the navigation solution (position and attitude) in real time at the time of the Event 1 and Event 2 pulse occurance.
• 20 Flight Management System (FMS)
Enables the Ethernet software interface (dedicated control and data port) for communication with Flight Management System and software triggering mechanism in real time firmware (refer to the POSTrack V6, starting on page L-1, for details).
• 22 Generic LiDAR Support (LID)
Enables automatic LiDAR logging control on/off based on start/end of the survey line.

Run POSConfig Utility
The following provides instructions to run PosConfig.exe to configure the PCS for the correct POS model, GNSS receiver, IMU type and other options.
Note: Ensure that firewalls and anti-spyware utilities are disabled before running POS Config.
1. Ensure POS AV system is properly connected and operational.
2. Power-up POS AV system.
3. Execute PosConfig.exe application; Select POS window opens


4. Select a POS IP Address and click Next button (an IP address may be entered manually); POS Config window opens.
5. Click Change Model button to select a different POS model. Available models are 610, 510, 410, 310; ‘AV’ is not changeable. Changing models requires an authorization code that must be purchased from Applanix.
6. Select IMU Type from drop-down menu


7. Select Primary GNSS Receiver type from drop-down menu.
8. Select Secondary GNSS Receiver type from drop-down menu.
9. Select applicable Options.
10. Click Update button - a prompt for an Authorization Code appears - please enter the code. Once operation is complete, Success window opens.


11. Click Exit button.
12. Recycle POS AV system power.


Warning: Do not power-down the POS AV system until POSConfig notifies that reconfiguration is complete.


When the YDC-O (Yaw Drift Control - Option) enabled, and the POS AV port setting set to gimbal GSM3000, the POS AV will send ASCII command "K" to RX RS232 serial port GSM3000.

The POS AV port setting as follow:
- Select Setting -> Input/ Output port Set Up -> COM2 setting
- Baud Rate : 19200,
- Parity : none,
- Data Bits : 8 bits,
- Stop Bits : 1 Bits,
- Flow Control : none
- Output Select : Gimbal,
- Input Select : Gimbal,
- Gimbal type : GSM3000,
- Update rate : 20 Hz

Please check picture below.

The POS AV will repeatedly send serial ASCII command "K" to serial COM2, at the first attempt to comunicate with GSM3000. When its connected with GSM3000 and no error on wiring connection, the GSM3000 will reply to POS AV the firmware version of the GSM3000 mount. The Gimbal status on POS AV will change to "Gimbal On: OK". Otherwise when the wiring connection is wrong, and the POS AV didn't receive the firmware version from GSM3000, the Gimbal status on POS AV will shown "Gimbal Off". Please check picture below.


After receiving command "K" the GSM3000 mount will identify itself and inform about its state in the form "Name_Version state (End of Line)". The name is separate by space, the version is chained with an underline and the two-digit code number are separated by space from the version. End of line is "\r\n".

For example: "GSM 3000_V4.8.843 01\r\n" means name GSM 3000, version V4.8.843, state Initialization.
Codes:
- 00 status OK
- 01 during the initialization

Note: state only available from version GSM3000.... 36 or higher.


Thursday, November 15, 2018

Using External GPS NMEA Input for Ardupilot APM 2.6

Using External GPS type NMEA mode for Ardupilot APM 2.6

To work with external GPS type NMEA mode, make sure your firmware installed is Ardu Rover v2.51 beta. Because other firmware (Arduplane and Ardu Copter) only support Ublox GPS.

The default baudrate for any GPS connected to Ardupilot APM 2.6 is 38400bps. You can change the baudrate setting using the factory configuration software, If you are using Garmin GPS 18, you can download snsrcfg.exe to changes baudrate.

Saturday, October 6, 2018

Using Arduino Nano as a External Shutter Release (External Trigger) with DigiCamControl Software


External triggers can be used to extend camera(s) capture capabilities like bulb mode for cameras which don't support it or to trigger multiple cameras in same time without lag. In this project we using Arduino Nano and opto Isolator to interface Shutter release PC serial Port Cable.

Nikon DSLR Camera require the metering circuit (Auto Focus) signal to be present when the shutter release signal fires. If the shutter release button on the camera half pressed, its will focusing the metering circuit to focus the camera lens. To handle with these two signal controls without interfere each others, we need an opto isolator for each signal control.

Nikon camera has an interface terminal called "Nikon 10-pin remote terminal", which has connected to ground pin, release trigger pin, and wake up/ focus pin. We use those pins to interfacing with Arduino Nano with PC serial that will be able to triggering Nikon Camera externally.


From the Arduino Nano digital output pins to these Nikon shutter pin and focus pin, we need to add opto isolator circuit to separate the camera power and the arduino power. The opto isolator also use to separate the focus signal and the shutter signal to avoid interfere each others when internal shutter button pressed manually.

To work with DigiCamControl Software External device Trigger, we need to define its interface controller first. This can be done in Setting->Device->Add. The image below shows the setting for Arduino Shutter Release, more combinations shows in Setting->Devices.


After a device is defined, the Arduino Nano shutter release can be used in multiple places like in multiple camera control. If the camera has an attached device, all capture action will executed by the device, not by the normal PTP script utility. In this way if the arduino Nano connected to 2 cameras and if we click on capture, both cameras will capture.


The DigiCamControl Software using RS232 serial protocol with default baudrate 9600bps. The Command control is using ASCII text ended with "Carriage Return" and "Line New" codes. The first line coding is to setting the baudrate and define the shutter pin on Arduino:


int RLY_CAMERA = 12;
            int BAUDRATE = 9600;

void setup()
{               
  // initialize the digital pin as an output.
  pinMode(RLY_CAMERA, OUTPUT);
 
  Serial.begin(BAUDRATE);
  while(!Serial)
  {
    ; // wait for serial port to connect. Needed for Leonardo only
  }
  // reserve 200 bytes for the inputString:
  inputString.reserve(100);
  digitalWrite(RLY_CAMERA, LOW); // Ccamera off
}


And for the next step, we need to matching the command to "Shutter ON" and "Shutter OFF" as declared before in DigiCamControl Software.


·                            Shutter ON  : “A”
·                            Shutter OFF : “O”


Below are the coding to check the command sent from DigiCamControl Software to the Arduino Nano and trigger the Camera if a command found.


// the loop routine runs over and over again forever:
void loop()
{
            digitalWrite(led, HIGH);   // turn the LED on (HIGH is the voltage level)
            digitalWrite(PULSE, HIGH);   // turn the LED on (HIGH is the voltage level)
            delay(1);               // wait for a microsecond
            digitalWrite(led, LOW);    // turn the LED off by making the voltage LOW
            digitalWrite(PULSE, LOW);   // turn the LED on (HIGH is the voltage level)
            delay(1);               // wait for a microsecond

            if (stringComplete)
            {
                        if (inputString.startsWith("A"))
                        {          
      Serial.println(inputString);
      Serial.println("Trigger ON");
      inputString = "";
      stringComplete = false;
      digitalWrite(RLY_CAMERA, HIGH);  
                        }
                        else if (inputString.startsWith("O"))
                        {
      Serial.println(inputString);
      Serial.println("Trigger OFF");
      inputString = "";
      stringComplete = false;
      digitalWrite(RLY_CAMERA, LOW);  
                        }
            }
}


void serialEvent()
{
  while (Serial.available())
  {
    // get the new byte:
    char inChar = (char)Serial.read();
    //delay(10);
    // add it to the inputString:
    if (inChar != '\n')
    {
            inputString += inChar;
    }
    // if the incoming character is a newline, set a flag
    // so the main loop can do something about it:
    if (inChar == '\n')
    {
            stringComplete = true;
    }
  }
}